Shader Unity - Outline shader
Chào mọi người. Hôm nay mình xin trờ lại với bài Shader Unity - Outline shader. Như các bạn đã biết, hiện ứng Outline là 1 trong những hiệu ứng được sử dụng phổ biến trong game. Mình sẽ giúp các bạn làm hiệu ứng này với Shader. Oke chúng ta bắt đầu nào. I, Ý tưởng Như bình thường muốn tạo ...
Chào mọi người.
Hôm nay mình xin trờ lại với bài Shader Unity - Outline shader.

Như các bạn đã biết, hiện ứng Outline là 1 trong những hiệu ứng được sử dụng phổ biến trong game. Mình sẽ giúp các bạn làm hiệu ứng này với Shader. Oke chúng ta bắt đầu nào.
I, Ý tưởng
Như bình thường muốn tạo Outline cho 1 tấm hình.
Ta cần 1 tấm hình A chứa ảnh và 1 tấm hình B chứa background cho line có tỷ lệ scale lớn hơn tấm hình rồi cho tấm hình A render đè lên tấm hình B.

Với tư tưởng ở trên ta sẽ áp dụng vào Shader như thế nào? May mắn là ở shader đã hỗ trợ cho vẽ 2 tấm hình A, B trong 1 shader và việc còn lại của chúng ta scale tấm B rồi set up tấm hình A render đè lên tấm hình B thui.
II, Thực hiện
Đầu tiên, ta có 1 shader đơn giản như hình

Shader code:
Shader "Custom/OutlineShader" {
	Properties {
		_Color("Main Color", Color) = (1,1,1,1)
		_MainTex("Main Texture",2D) = "white"{}
	}

	SubShader {
		Pass {
			CGPROGRAM
			 #pragma vertex vert
			 #pragma fragment frag

			 uniform sampler2D _MainTex;
			 uniform half4 _Color;

			 struct vertexInput {
			 	float4 position: POSITION;
			 	float4 texcoord: TEXCOORD0;
			 };

			 struct vertexOutput {
			 	float4 position: SV_POSITION;
			 	float4 texcoord: TEXCOORD0;
			 };

			 vertexOutput vert(vertexInput v)
			 {
					vertexOutput o;
					o.position = UnityObjectToClipPos(v.position);
					o.texcoord = v.texcoord;
					return o;
			 }

			 half4 frag(vertexOutput i): COLOR
			 {
			 	return tex2D(_MainTex,i.texcoord.xy) * _Color;
			 }
			ENDCG
		}
	}
}
Bây giờ, ta đã có tấm hình A được vẽ bởi cube và tiếp đến là vẽ tấm hình B. Thì shader đã hỗ trợ việc này bằng cách thêm Pass (Tham khảo thêm: https://docs.unity3d.com/Manual/SL-Pass.html)
Shader code:
// Upgrade NOTE: replaced 'mul(UNITY_MATRIX_MVP,*)' with 'UnityObjectToClipPos(*)'

Shader "Custom/OutlineShader" {
	Properties {
		_Color("Main Color", Color) = (1,1,1,1)
		_MainTex("Main Texture",2D) = "white"{}
		_OutlineWidth("Outline Width", float) = 0.1
		_OutlineColor("Outline Color",Color) = (1,1,1,1)
	}

	SubShader {
    // hình A
		Pass {
			CGPROGRAM
			 #pragma vertex vert
			 #pragma fragment frag

			 uniform sampler2D _MainTex;
			 uniform half4 _Color;

			 struct vertexInput {
			 	float4 position: POSITION;
			 	float4 texcoord: TEXCOORD0;
			 };

			 struct vertexOutput {
			 	float4 position: SV_POSITION;
			 	float4 texcoord: TEXCOORD0;
			 };

			 vertexOutput vert(vertexInput v)
			 {
					vertexOutput o;
					o.position = UnityObjectToClipPos(v.position);
					o.texcoord = v.texcoord;
					return o;
			 }

			 half4 frag(vertexOutput i): COLOR
			 {
			 	return tex2D(_MainTex,i.texcoord.xy) * _Color;
			 }

			ENDCG
		}

    // hình B
		Pass {

			CGPROGRAM
			 #pragma vertex vert
			 #pragma fragment frag

			 uniform half4 _OutlineColor;
			 uniform float _OutlineWidth;

			 struct vertexInput {
			 	float4 position: POSITION;
			 	float4 texcoord: TEXCOORD0;
			 };

			 struct vertexOutput {
			 	float4 position: SV_POSITION;
			 	float4 texcoord: TEXCOORD0;
			 };

			 vertexOutput vert(vertexInput v)
			 {
					vertexOutput o;
					o.position = UnityObjectToClipPos(v.position);
					return o;
			 }

			 half4 frag(vertexOutput i): COLOR
			 {
			 	return _OutlineColor;
			 }

			ENDCG
		}
	}
}
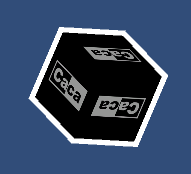
 Và ta được kết quả như hình trên. Ta thấy hình cube đã được vẽ lên màn hình được tô lên toàn màu trắng nghĩa là hình A đã bị hình B đè lên.
Bước cuối cùng chúng ta cần thực hiện là ẩn hình B sau hình A và scale B lớn lên.
Bây giờ update code. Full code:
// Upgrade NOTE: replaced 'mul(UNITY_MATRIX_MVP,*)' with 'UnityObjectToClipPos(*)'

Shader "Custom/OutlineShader" {
	Properties {
		_Color("Main Color", Color) = (1,1,1,1)
		_MainTex("Main Texture",2D) = "white"{}
		_OutlineWidth("Outline Width", float) = 0.1
		_OutlineColor("Outline Color",Color) = (1,1,1,1)
	}

	SubShader {

		Pass {

			CGPROGRAM
			 #pragma vertex vert
			 #pragma fragment frag

			 uniform sampler2D _MainTex;
			 uniform half4 _Color;

			 struct vertexInput {
			 	float4 position: POSITION;
			 	float4 texcoord: TEXCOORD0;
			 };

			 struct vertexOutput {
			 	float4 position: SV_POSITION;
			 	float4 texcoord: TEXCOORD0;
			 };

			 vertexOutput vert(vertexInput v)
			 {
					vertexOutput o;
					o.position = UnityObjectToClipPos(v.position);
					o.texcoord = v.texcoord;
					return o;
			 }

			 half4 frag(vertexOutput i): COLOR
			 {
			 	return tex2D(_MainTex,i.texcoord.xy) * _Color;
			 }

			ENDCG
		}

		Pass {
			Cull Front
			CGPROGRAM
			 #pragma vertex vert
			 #pragma fragment frag

			 uniform half4 _OutlineColor;
			 uniform float _OutlineWidth;

			 struct vertexInput {
			 	float4 position: POSITION;
			 	float4 texcoord: TEXCOORD0;
			 };

			 struct vertexOutput {
			 	float4 position: SV_POSITION;
			 	float4 texcoord: TEXCOORD0;
			 };

			 float4 Outline(float4 vertPos, float awidth)
			{
				float4x4 scaleMat;
				scaleMat[0][0] = 1.0 + awidth;
				scaleMat[0][1] = 0.0;
				scaleMat[0][2] = 0.0;
				scaleMat[0][3] = 0.0;
				scaleMat[1][0] = 0.0;
				scaleMat[1][1] = 1.0 + awidth;
				scaleMat[1][2] = 0.0;
				scaleMat[1][3] = 0.0;
				scaleMat[2][0] = 0.0;
				scaleMat[2][1] = 0.0;
				scaleMat[2][2] = 1.0 + awidth;
				scaleMat[2][3] = 0.0;
				scaleMat[3][0] = 0.0;
				scaleMat[3][1] = 0.0;
				scaleMat[3][2] = 0.0;
				scaleMat[3][3] = 1.0;

				return mul(scaleMat, vertPos);
			}

			 vertexOutput vert(vertexInput v)
			 {
					vertexOutput o;
					o.position = UnityObjectToClipPos(Outline(v.position,_OutlineWidth));
					return o;
			 }

			 half4 frag(vertexOutput i): COLOR
			 {
			 	return _OutlineColor;
			 }

			ENDCG
		}
	}
}
Hàm float4 Outline(float4 vertPos, float awidth) sẽ giúp ta scale hình B lên bởi scale cube. Ta lấy tọa độ các đỉnh nhân với 1 matrix scaleMat ( scale matrix). (Cái này các bạn tự tìm hiểu thêm về kiến thức toán https://docs.unity3d.com/ScriptReference/Matrix4x4.Scale.html)
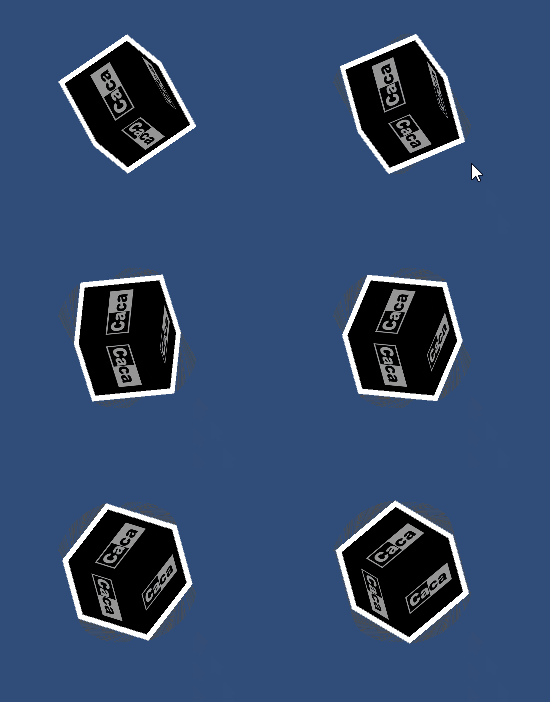
Và ta set Cull Front giúp hình B ẩn sau A. Kết quả cuối cùng ta được outline như hình.

Cảm ơn mọi người đã xem tới đây. Hẹn gặp lại vào bài viết sau. Full code: http://www.mediafire.com/file/sopt5rrm9cvuh3c/
