Tạo Single Page Application với ReactJS
Để làm một ứng dụng Single Page -SPA thì có nhiều cách triển khai và trong bài viết này tôi sẽ hướng tới cách dùng ReactJS để tạo ra một chương trình như thế. Nếu bạn đã biết qua một chút về ReactJS thì bài viết này có thể hữu ích cho bạn trong quá trình tìm hiểu về ReactJS. Để tạo ra một SPA thì ...
Để làm một ứng dụng Single Page -SPA thì có nhiều cách triển khai và trong bài viết này tôi sẽ hướng tới cách dùng ReactJS để tạo ra một chương trình như thế. Nếu bạn đã biết qua một chút về ReactJS thì bài viết này có thể hữu ích cho bạn trong quá trình tìm hiểu về ReactJS. Để tạo ra một SPA thì tôi sẽ cần dùng những Module dưới đây :
- ReactJS(component、JSX、rendering)
- React-Router(di chuyển page)
- Redux(quản lý trạng thái)
- MaterialUI(UI component)
- babel(transformer compiler)
- webpack(compile resource file làm 1)
Editor thì dùng gì cũng được nhưng mà ý kiến cá nhân của tôi recommend VSCode mặc định su bóp JSX. ESLint thì sẽ check cú pháp trước ki build nên cho vào sẽ ngon hơn. React Developer Tools là một addon dùng cho dev React trên Chrome. Tôi sẽ cần dùng yarn để quản lý package.
$ npm install -g yarn
Để mà rendering DOM bằng ReactJS thì sẽ cần :
- ReactJS
- React DOM
- Babel
Để cho dễ dàng thì sẽ đọc nhưng file trên thông qua CDN.
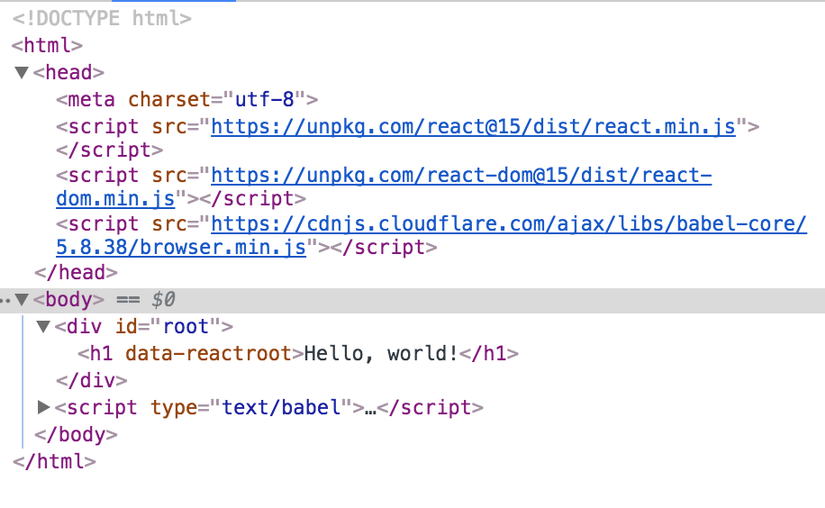
// File index.html
<!DOCTYPE html>
<html>
<head>
  <meta charset="utf-8">
  <script src="https://unpkg.com/react@15/dist/react.min.js"></script>
  <script src="https://unpkg.com/react-dom@15/dist/react-dom.min.js"></script>
  <script src="https://cdnjs.cloudflare.com/ajax/libs/babel-core/5.8.38/browser.min.js"></script>
</head>
<body>
  <div id="root"></div>
  <script type="text/babel">
    ReactDOM.render(
      <h1>Hello, world!</h1>,
      document.getElementById('root')
    )
  </script>
</body>
</html>
Rendering trong thực tế là phần ReactDOM.render, điều mà bạn để ý sẽ thấy là dù ngay trong thẻ script mà lại có thẻ <h1> được viết. Khi mà được chạy thực tế thì nó sẽ được biến đổi thành JS như sau bằng Babel. Và việc viết lẫn lộn DOM kiểu như thế gọi là JSX :
// File compile.js
ReactDOM.render(React.createElement(
    'h1',
    null,
    'Hello, world!'
), document.getElementById('root'));
Ở method React.CreateElement thì DOM sẽ được sinh ra ngay dưới root.

Để mà xác định xem là nó có đang được biến đổi thành dạng compile.js hay không thì tôi sẽ dùng Babel transform compiler của JSX.
// Cài đặt Babel command
yarn global add babel-cli
// Tạo package.json
yarn init -y
// Download JSX transform compiler của Babel
yarn add --dev babel-plugin-transform-react-jsx
Tạo file test.jsx trích ra phần JS bên dưới :
// file test.jsx
ReactDOM.render(
    <h1>Hello, world!</h1>,
    document.getElementById('root')
  )
Bằng command dưới sẽ thực hiện transform compile của Babel trực tiếp đối với test.jsx thì compile.js sẽ được export ra.
$ babel --plugins transform-react-jsx test.js
Khi mà sử dụng webpack thì ta có thể tổng hợp nhiều files thành một. Và hơn thế khi mà kết hợp với Babel thì ngoài biến đổi JSX thì trên trình duyệt những import mà chưa được thực hiện cũng có thể sử dụng được. Nên có thể gọi được module của file JS từ file JS. Để mà build bằng webpack thì tôi sẽ thêm package
$ yarn add --dev webpack babel-core babel-loader babel-plugin-transform-react-jsx babel-preset-react react react-dom
File package.json sau khi install sẽ như bên dưới ( nếu mà không chỉ định version thì nó sẽ là mới nhất ).
// file package.json
{
  "devDependencies": {
    "babel-core": "^6.26.0",
    "babel-loader": "^7.1.2",
    "babel-plugin-transform-react-jsx": "^6.24.1",
    "babel-preset-react": "^6.24.1",
    "react": "^16.0.0",
    "react-dom": "^16.0.0",
    "webpack": "^3.6.0"
  }
}
Nó sẽ có cấu trúc tree như dưới :
├── App.js
├── index.html
├── index.js
├── node_modules
├── package.json
└── webpack.config.js
Tôi sẽ đi tạo component của React bằng việc kế thừa React.Component. Bằng method render sẽ trả về DOM. Tôi có thể import class từ JS bên ngoài bằng export default.
// File App.js
import React from 'react'

export default class App extends React.Component {

    render () {
        return <h1>Hello, world!</h1>
    }

}
Trong index.js tôi sẽ import React compoent đã tạo và rendering DOM. Bạn để ý sẽ thấy là có thể chỉ định DOM là <App /> trên JSX. Tức là có thể chỉ định React component đã tạo bằng React DOM như là một DOM mới
// file index.js
import React  from 'react'
import ReactDOM from 'react-dom'
import App from './App'

ReactDOM.render(
    <App />,
    document.getElementById('root')
)
Tôi sẽ đổi cách viết index.html để chỉ đọc file bundle.js ( bundle.js là file sẽ được sinh ra sau khi build bằng webpack).
index.html
<!DOCTYPE html>
<html>
<head>
  <meta charset="utf-8">
</head>
<body>
  <div id="root"></div>
  <script type='text/javascript' src="bundle.js" ></script>
</body>
</html>
Để mà build bằng webpack thì tôi cần tạo file setting webpack.config.js :
// file webpack.config.js
module.exports = {
    entry: './index.js', // file jsx của entry point
    output: {
      filename: 'bundle.js' // file sẽ xuất ra
    },
    module: {
      loaders: [{
        test: /.js?$/, // đuôi mở rộng là js
        exclude: /node_modules/, // loại trừ bên dưới thư mục node_modules
        loader: 'babel-loader', // sử dụng babel-loader
        query: {
          plugins: ["transform-react-jsx"] // sử dụng plugin transform-react-jsx của babel
        }
      }]
    }
  }
Và cuối cùng bằng lệnh dưới thì có thể tổng hợp những file JS liên quan đến index.js để expport ra file bundle.js duy nhất.
$ node_modules/webpack/bin/webpack.js
Hash: 7a16807494494a5823f6
Version: webpack 3.6.0
Time: 6049ms
    Asset    Size  Chunks                    Chunk Names
bundle.js  835 kB       0  [emitted]  [big]  main
  [15] ./index.js 168 bytes {0} [built]
  [32] ./App.js 258 bytes {0} [built]
    + 31 hidden modules
Giờ bạn hãy thử mở file index.html, chắc chắn là sẽ được hiển thị.

Nếu mà đang trong quá trình phát triển để rảnh tay tiện lợi hơn thì lệnh dưới sẽ giúp ta giám sát và tự thực hiện build khi mà có sự thay đổi của file JS được lưu lại.
$ webpack --watch
React cơ bản
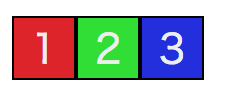
Để mà nhớ rule cơ bản của React tôi sẽ tạo một ứng dụng đơn giản. Tôi sẽ tạo ra compoent box :
 https://viblo.asia/uploads/0bc1e611-117a-431f-b7a7-070f5fddcde7.png
Khi click vào vào mỗi box thì số sẽ tự động count up lên.

Đầu tiên tôi sẽ tạo component của box.
// file Rect.js
import React from 'react'

export default class Rect extends React.Component {

  constructor (props) {
    super(props)
    // state object
    this.state = { number : this.props.num }
  }

  componentWillMount () {
    // giá trị thuộc tính  trong props
    const { num, bgcolor } = this.props

    // CSS style viết thuộc tính bằng camle case
    this.rectStyle = {
      background: bgcolor,
      display: 'table-cell',
      border: '1px #000 solid',
      fontSize: 20,
      awidth: 30,
      height: 30,
      textAlign: 'center',
      verticalAlign: 'center',
    }

  }

  // count up
  countUp (num) {
    // cập nhật tham số của state object → render method được gọi và vẽ lại
    this.setState({ number : num + 1 })
  }

  render () {

    // trường hợp mà nhiều dòng sẽ bao bọc bởi cặp ()
    // chỉ một DOM trên cùng sẽ trả về
    return (
      <div style={ this.rectStyle } onClick={(e)=> this.countUp(this.state.number)}>
        <span style={{ color : '#eeeeee' }}>{this.state.number}</span>
      </div>
    )
  }
}
Trên App.js sẽ đọc React component và hiển thị ra.
// file App.js
import React from 'react'
import Rect from './Rect'

export default class App extends React.Component {

  render () {
    return (
      <div>
        <Rect num={1} bgcolor='#e02020' />
        <Rect num={2} bgcolor='#20e020' />
        <Rect num={3} bgcolor='#2020e0' />
      </div>
    )
  }
}
Về vòng đời của React component
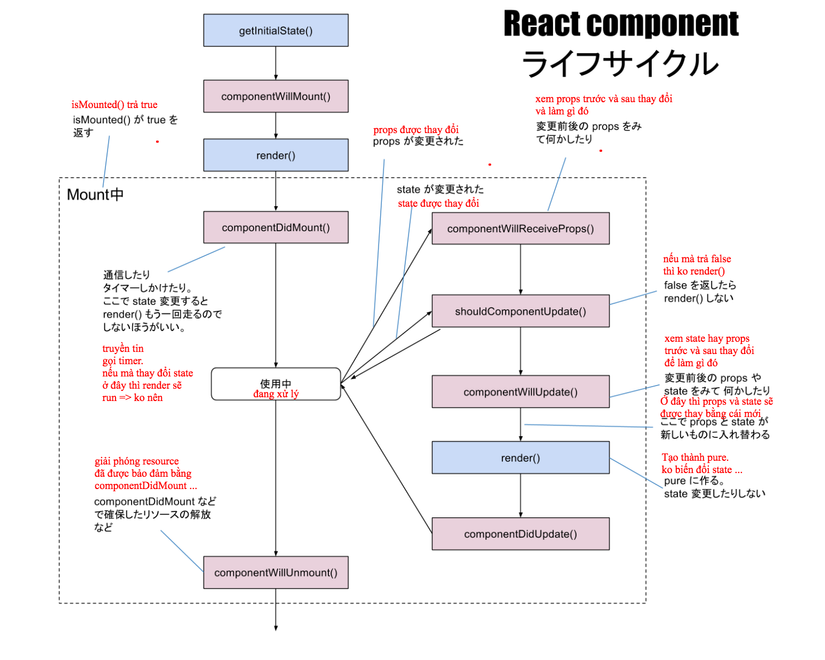
Bên dưới là bức tranh tổng quát bạn có thể xem ảnh sau :

Để mà giải thích các loại method thì tôi sẽ có bài chi tiết sau.
Khi mà bắt đầu và khi giá trị thuộc tính thay đổi thì componentWillMount sẽ được gọi và khi mà được vẽ ra thì render sẽ được gọi là 2 cái hay dùng nhất nên bạn cần nhớ chúng.
Trường hợp mà muốn xem thay đổi của props sau khi truyền tin để làm gì đó thì sẽ sử dụng componentWillReceiveProps method, còn khi mà muốn thao tác trực tiếp DOM thì sẽ thêm event của DOM vào componentDidMount method, rồi xoá event bằng componentWillUnmount method.
Về giá trị thuộc tính
Trong React compoent mới tạo thì có thể đinh nghĩa DOM bình thường và giá trị thuộc tính cùng nhau.
// file App.js
<Rect num={1} bgcolor='#e02020' />
Thuộc tính định nghĩa độc lập sẽ được lưu trong props object và truyền sang cho React component.
// file React.js
componentWillMount () {
    // giá trị thuộc tính được truyền từ props
    const { num, bgcolor } = this.props
Về CSS Style
Khi mà truyền style bên trong JSX thì cần viết bằng camel case, nó sẽ biến đổi cho ta thành CSS bằng babel. Ví dụ như font-size thì sẽ cần ghi là fontSize.
// file React.js
    // CSS style viết dạng camel case
    this.rectStyle = {
      background: bgcolor,
      display: 'table-cell',
      border: '1px #000 solid',
      fontSize: 20,
      awidth: 30,
      height: 30,
      textAlign: 'center',
      verticalAlign: 'center',
    }
Có thể viết JS trong {} của JSX. Lần này sẽ truyền style objec của JS.
// file React.js
   <div style={ this.rectStyle } >
Về state của component
Bên trong compoent nếu bạn muốn lưu giữ trạng thái thì sẽ cần định nghĩa object đặc thù là state object. Về tham số bên trong thì có thể đưa vào thoải mái. Lần này tôi sẽ làm để click vào số sẽ được thực hiện count up lên. Và lưu giữ tham số number.
// file React.js
  // state object
  this.state = { number : this.props.num }
Chỗ mà mô tả về Event handling và cập nhật number object là chỗ bên dưới. Để mà cập nhật tham số của state object trong React thì có method setState được chuẩn bị. Khi được click thì nó sẽ được gọi và thực hiện cập nhật lại tham số của state object, rồi gọi tới render method để vẽ lại.
// file React.js

  // count up
  countUp (num) {
    // cập nhật tham số của state object → render sẽ được gọi để vẽ lại
    this.setState({ number : num + 1 })
  }

  render () {
     return (
      <div onClick={(e)=> this.countUp(this.state.number)}>
Không được trực tiếp gọi setState bên trong render vì nó gây ra vòng lặp vô hạn render→setState→render.
Bằng việc dùng Redux thì ta có thể quản lý đượcc trạng thái tổng thể của ứng dụng, việc dùng event callback đên cập nhật tham số của store được quản lý rồi phản ánh vẽ lại sẽ rất nhàn hạ.
Redux được thiết kế ra với ý tưởng sau :
- nếu có nhiều store sẽ có thể nảy sinh sự không khớp nhau nên sẽ tách từ component sử dụng trong view lưu vào một store.
- để mà cập nhật store sẽ tiến hành bởi action đã được định trước
- Reducer tiến hành thay đổi state cho thành hàm đơn giản (Pure)
Để mà cho React và Redux cùng nhau hoạt động thì sẽ sử dụng package npm của react-redux nhưng sẽ có nhiều cách viết của connect. Tôi sẽ thử pattern connect về react-redux kết nối React và Redux, dùng decorators. Bằng lênh dưới là có thể install package liên quan Redux
$ yarn add --dev babel-plugin-transform-decorators-legacy redux redux-devtools redux-thunk react-redux react-router-redux
package.json sẽ như bên dưới :
package.json
{
  "name": "meetdep",
  "version": "1.0.0",
  "description": "",
  "main": "test.js",
  "scripts": {
    "test": "echo "Error: no test specified" && exit 1"
  },
  "keywords": [],
  "author": "",
  "license": "ISC",
  "devDependencies": {
    "axios": "^0.16.2",
    "babel-core": "^6.26.0",
    "babel-loader": "^7.1.2",
    "babel-plugin-transform-decorators-legacy": "^1.3.4",
    "babel-plugin-transform-react-jsx": "^6.24.1",
    "babel-preset-react": "^6.24.1",
    "react": "^16.0.0",
    "react-dom": "^16.0.0",
    "react-router-dom": "^4.2.2",
    "redux": "^3.7.2",
    "redux-devtools": "^3.4.0",
    "redux-thunk": "^2.2.0",
    "react-redux": "^5.0.6",
    "react-router-redux": "^4.0.8",
    "webpack": "^3.6.0"
  },
  "dependencies": {}
}
Vì sẽ sử dụng cú pháp của decorator nên tôi sẽ thêm plugin babel-plugin-transform-decorators-legacy vào webpack.config.js.
// file webpack.config.js
module.exports = {
    entry: './index.js', // file jsx entry point
    output: {
      filename: 'bundle.js' // file xuất ra
    },
    module: {
      loaders: [{
        test: /.js?$/, // đuôi là js
        exclude: /node_modules/, // loại trừ thư mục node_modules
        loader: 'babel-loader', // sử dụng babel-loader
        query: {
          plugins: ["transform-react-jsx","babel-plugin-transform-decorators-legacy"] // dùng transform-react-jsx của babel biến đổi jsx
        }
      }]
    }
  }
Tôi sẽ viết lại index.js :
// file index.js
import React  from 'react'
import ReactDOM from 'react-dom'
// thêm applyMiddleware
import { createStore, applyMiddleware } from 'redux'
// thêm Provider component của react-redux
import { Provider } from 'react-redux'
import App from './App'
// đọc reducer
import reducer from './reducer'

// tạo store
const store = createStore(reducer)

// Nếu bọc bằng thẻ Provider thì có thể sử dụng store trong App
ReactDOM.render(
    <Provider store={store}>
      <App />
    </Provider>,
    document.getElementById('root')
)
Tôi sẽ cần viết reducer để đọc vào reducer.js
// file reducer.js
import { combineReducers } from 'redux'
// reducer lấy comment
import comment from './comment'

// thêm reducer đã tạo vào object
// Bằng combineReducers sẽ được tổng hợp lại làm 1
export default combineReducers({
  comment
})
Rồi tôi cũng cần tạo reducer dùng cho comment, viết vào comment.js :
// file comment.js
// định nghĩa tên actione sẽ nhận lấy bằng reducer
const LOAD = 'comment/LOAD'

// object khởi tạo
const initialState = {
  comments: null,
}

// định nghĩa của reducer(khi mà dispatch sẽ được callback)
export default function reducer(state = initialState, action = {}){
  // tuỳ theo loại action sẽ cập nhật state
  switch (action.type) {
    case LOAD:
      return {
        comments:action.comments,
      }
    default:
      // mặc định khi khởi tạo sẽ rơi vào đây(object của initialState sẽ được trả về)
      return state
  }
}

// định nghĩa của  action
export function load() {
  const comments = 'hello'
  // trả về loại action và state cập nhật (được dispatch)
  return { type: LOAD, comments }
}
Khi mà kick action của comment bằng App.js thì sẽ tiến hành cập nhật state qua reducer.
// file App.js
import React from 'react'
import { connect } from 'react-redux';
// lấy ra action của reducer comment
import { load } from './comment'

// connectのdecorator
@connect(
  state => ({
    // trả về kết quả đã nhận bằng reducer vào props
    comments: state.comment.comments
  }),
  // chỉ định action
  { load }
)
export default class App extends React.Component {

  componentWillMount() {
    // kick action của comment
    this.props.load()
  }

  render () {
    // state đã lất được bằng connect sẽ ở trong props
    const { comments } = this.props
    // lând đầu null được trả về, sau khi xử lý thì kết quả sẽ được trả về
    console.log(comments)
    return (
      <div>{comments}</div>
    )
  }
}
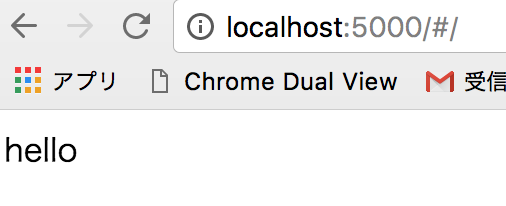
Và kết quả sẽ như bên dưới :

Thực hiện action bất đồng bộ
Tôi sẽ làm để action được bất đồng bộ, khi mà sử dụng react-redux thực tế thì tôi nghĩ nó sẽ xoay quanh truyền tin và di chuyển màn hình. Còn nếu sử dụng redux-thunk thì có thể xử lý action một cách bất động bộ.
Tôi cần cài đặt thư viện dùng cho việc truyền tin là axios.
$ yarn add --dev axios
/// file index.js
import React  from 'react'
import ReactDOM from 'react-dom'
import { createStore, applyMiddleware } from 'redux'
import { Provider } from 'react-redux'
import client from 'axios'
import thunk from 'redux-thunk'

import App from './App'
import reducer from './reducer'

// thêm axios vào đối số của thunk
const thunkWithClient = thunk.withExtraArgument(client)
// áp dụng redux-thunk vào middleware
const store = createStore(reducer, applyMiddleware(thunkWithClient))

ReactDOM.render(
    <Provider store={store}>
      <App />
    </Provider>,
    document.getElementById('root')
)
Tôi sẽ đi sửa lại file reducer.js, lần này sẽ là tạo reducer dùng cho user.
// file reducer.js
import { combineReducers } from 'redux'

import user from './user'

export default combineReducers({
  user,
})
Tôi sẽ tạo reducer lấy thông tin user đã sinh ra bởi Random User Generator bằng API trong user.js.
// file user.js
const LOAD = 'user/LOAD'

const initialState = {
  users: null,
}

export default function reducer(state = initialState, action = {}){
  switch (action.type) {
    case LOAD:
      return {
        users:action.results,
      }
    default:
      return state
  }
}

export function load() {
  // client là tham số client đã gán của axios
  // có thể viết xử lý bất đồng bộ bằng dạng Promise
  return (dispatch, getState, client) => {
    return client
      .get('https://randomuser.me/api/')
      .then(res => res.data)
      .then(data => {
        const results = data.results
        // dispatch và gọi reducer
        dispatch({ type: LOAD, results }
