Viết game bằng SpriteKit
Như thường lệ, ai đã làm game trên IOS chăc cũng từng dùng SpriteKit,mình khi tìm hiểu về SpriteKit cũng có viết 1 vài game đơn giản.Bài viết này mình sẽ share cách làm 1 trong các game đó 1.Tạo Project Đầu tiên tạo project, mình đặt tên game là Mole( các bạn đặt tuỳ ý theo ý mình),Khi tạo có ...
Như thường lệ, ai đã làm game trên IOS chăc cũng từng dùng SpriteKit,mình khi tìm hiểu về SpriteKit cũng có viết 1 vài game đơn giản.Bài viết này mình sẽ share cách làm 1 trong các game đó
1.Tạo Project
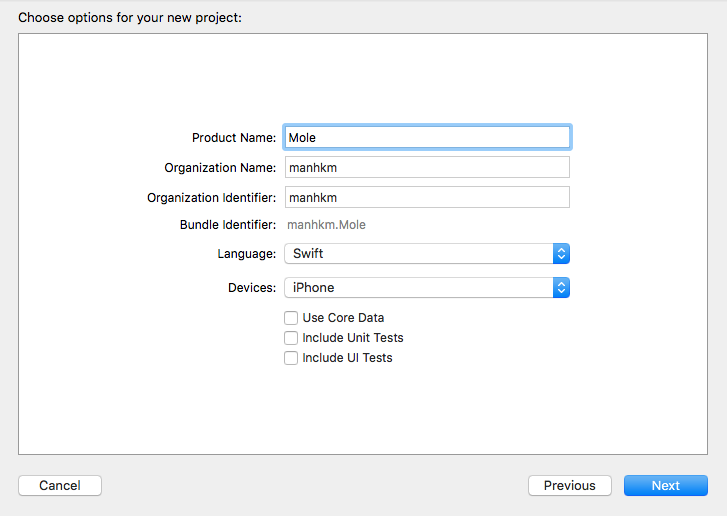
Đầu tiên tạo project, mình đặt tên game là Mole( các bạn đặt tuỳ ý theo ý mình),Khi tạo có thể chọn khởi tạo là Single View Application hay Game , ở đây mình chọn Single View Application(chọn Game thì mục tạo ra sẵn có nhiều code thừa, lại phải xoá)
2.Import và set SKScene
Sau khi khởi tạo xong project, vào Main.storyboard chọn View ,mục Custom class trong Inspector chọn class là SKView,tiếp vào ViewController.swift để import SpriteKit và thiết lập SKScene
import SpriteKit
class ViewController: UIViewController {
override func viewDidLoad() {
    super.viewDidLoad()

    let skView = self.view as! SKView
    //show FPS
    skView.showsFPS = true
    //show NodeCount
    skView.showsNodeCount = true

    let scene = SKScene()
    //set size = skView
    scene.size = skView.frame.size
    scene.scaleMode = SKSceneScaleMode.AspectFit

    //display SKScene
    skView.presentScene(scene)
}
// Ẩn status bar
override func prefersStatusBarHidden() -> Bool {
    return true
}
Sau thiết lập ban đầu các bạn có thể Run thử để xem hiển thị theo thiết lập có đúng không.
3.Tạo class quản lí game
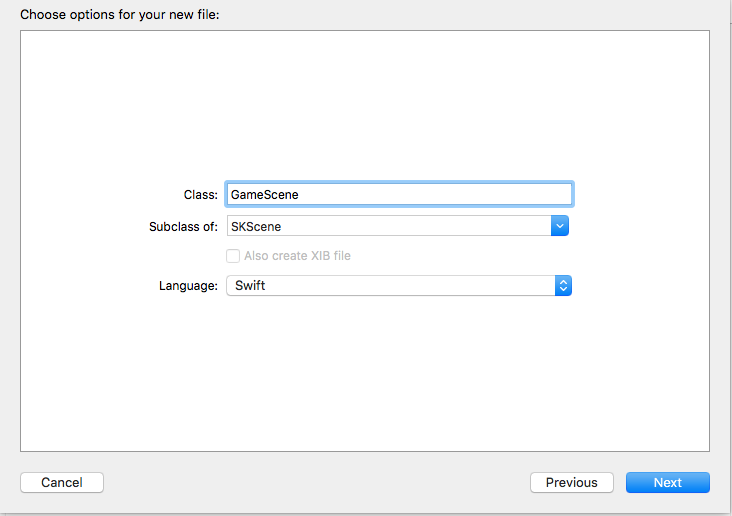
Tiếp theo sẽ tạo class GameScene để quản lí màn hình Game,từ Menu chọn File > New > File > IOS > Source >Cocoa Touch Class and click Next, tên class nhập GameScene, subclass chọn SKScene,click Next 
Tiếp cần import SpriteKit trong GameScene.swift
import SpriteKit
Bắt đầu tạo Node , thiết lập trong game (viết trong class GameScene)
override func didMoveToView(view: SKView) {
    let background = SKSpriteNode(imageNamed: "background")
    background.position = CGPointMake(self.frame.midX, self.frame.midY)
    addChild(background)
}
Trong ViewController.swift thiết lập để hiển thị GameScene (mình lấy size của iphone 6 làm chuẩn)
let scene = GameScene(size: CGSize(awidth: 375, height: 667))
Tiếp thiết lập các node và action ban đầu trong game
override func didMoveToView(view: SKView) {
    let background = SKSpriteNode(imageNamed: "background")
    background.position = CGPointMake(self.frame.midX, self.frame.midY)
    addChild(background)

    //Set Cac Node
    let hole1 = SKSpriteNode(imageNamed: "hole")
    hole1.position = CGPointMake(100, 200)
    addChild(hole1)

    Moles.append(SKSpriteNode(imageNamed: "Mole"))
    Moles[0].position = molePosition[0]
    addChild(Moles[0])

    let hide1 = SKSpriteNode(imageNamed: "hide")
    hide1.position = CGPointMake(100, 176)
    hide1.userInteractionEnabled = false
    addChild(hide1)

    let hole2 = SKSpriteNode(imageNamed: "hole")
    hole2.position = CGPointMake(275, 200)
    addChild(hole2)

    Moles.append(SKSpriteNode(imageNamed: "Mole"))
    Moles[1].position = molePosition[1]
    addChild(Moles[1])

    let hide2 = SKSpriteNode(imageNamed: "hide")
    hide2.position = CGPointMake(275, 176)
    hide2.userInteractionEnabled = false
    addChild(hide2)

    let hole3 = SKSpriteNode(imageNamed: "hole")
    hole3.position = CGPointMake(100, 50)
    addChild(hole3)

    Moles.append(SKSpriteNode(imageNamed: "Mole"))
    Moles[2].position = molePosition[2]
    addChild(Moles[2])

    let hide3 = SKSpriteNode(imageNamed: "hide")
    hide3.position = CGPointMake(100, 26)
    hide3.userInteractionEnabled = false
    addChild(hide3)

    let hole4 = SKSpriteNode(imageNamed: "hole")
    hole4.position = CGPointMake(275, 50)
    addChild(hole4)

    Moles.append(SKSpriteNode(imageNamed: "Mole"))
    Moles[3].position = molePosition[3]
    addChild(Moles[3])

    let hide4 = SKSpriteNode(imageNamed: "hide")
    hide4.position = CGPointMake(275, 26)
    hide4.userInteractionEnabled = false
    addChild(hide4)

    //Set chuyen dong Mole
    for index in 0...3 {
        Moles[index].position = molePosition[index]
        moleAction(Moles[index])
    }

}
Sau khi set xong các node tiếp sẽ cần viết function cho chuyển động của các Node,các action có sẵn trong SpiriteKit nên chỉ cần gọi ra và thay đổi tham số theo ý mình.
func moleAction(sprite:SKSpriteNode){
    //set time wait
    let action1 = SKAction.waitForDuration(2.0,withRange: 2.0)

    //set chuyen dong theo tang toa do theo Y len 100
    let action2 = SKAction.moveByX(0, y: 100, duration: 1.0)

    let action3 = SKAction.waitForDuration(1.0,withRange: 2.0)

    //set chuyen donng -100 theo Y
    let action4 = SKAction.moveByX(0, y: -100, duration: 1.0)

    //set thuc hien lap cac action1,2,3,4
    let actionSequence = SKAction.sequence([action1,action2,action3,action4])

    //set repeat Action Forever
    let actionRepeat = SKAction.repeatActionForever(actionSequence)
    sprite.runAction(actionRepeat)
}
4.Run và xác nhận action trong game
Sau khi thiết lập xong, có thể Run để xem thử hiển thị và chuyển động có đúng theo ý mình không, không thì bạn có thể đổi các thông số time trong các action(muốn nhanh hay chậm tuỳ ý chỉnh theo).Phần tiếp theo mình sẽ viết thêm và các action

