Event Binding trong Angular 7
Data Binding trong Angular 7 Nội dung chính Giới thiệu Event Binding trong Angular7 Ví dụ Event Binding với sự kiện (click) button Ví dụ Event Binding với sự kiện (change) drop-down Giới thiệu Event Binding trong Angular7 Trong chương này, chúng ta ...
Nội dung chính
- Giới thiệu Event Binding trong Angular7
- Ví dụ Event Binding với sự kiện (click) button
- Ví dụ Event Binding với sự kiện (change) drop-down
Giới thiệu Event Binding trong Angular7
Trong chương này, chúng ta sẽ thảo luận về cách liên kết sự kiện (Event Binding) trong Angular 7 hoạt động như thế nào. Khi người dùng tương tác với một ứng dụng dưới dạng gõ bàn phím, click chuột hoặc di chuột qua lại, nó sẽ tạo ra một sự kiện. Những sự kiện này cần được xử lý để thực hiện một số hành động.
Hãy xem các ví dụ sau để hiểu rõ hơn về Event Binding trong Angular7.
Ví dụ Event Binding với sự kiện (click) button
Tạo hàm myClickFunction(event) trong fle app.component.ts như sau:
import { Component } from '@angular/core';

@Component({
  selector: 'app-root',
  templateUrl: './app.component.html',
  styleUrls: ['./app.component.css']
})
export class AppComponent {
  title = 'Angular 7';

  // khai bao mang cac thang.
  months = ["January", "February", "March", "April", "May", "June", "July",
      "August", "September", "October", "November", "December"];

  showAge = false;

  myClickFunction(event) {
    // hiển thị thông báo
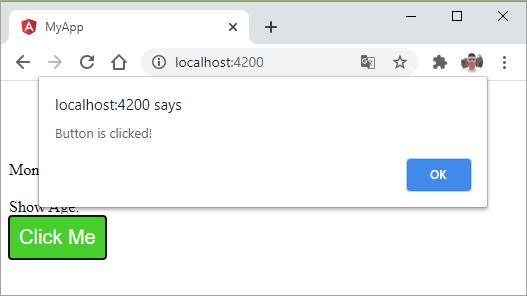
    alert("Button is clicked!");
    // hiện thị log ra console
    console.log(event);
  }
}
Sau đây, chúng ta sẽ liên kết sự kiện click chuột vào button "Click Me" với hàm myClickFunction($event) trong file app.component.html như sau:
<div style="text-align:center">
  <h1>
    Welcome to {{ title }}!
  </h1>
</div>

<div> Months :
  <select>
    <option *ngFor = "let i of months">{{i}}</option>
  </select>
</div>
<br/>

<div *ngIf="showAge; then condition1 else condition2"> Age = 18 </div>
<ng-template #condition1>Hide Age.</ng-template>
<ng-template #condition2>Show Age.</ng-template>
<br/>

<button (click) = "myClickFunction($event)">
  Click Me
</button>

<router-outlet></router-outlet>
Điều này có nghĩa là khi bạn click vào button "Click Me" thì hàm Javascript myClickFunction(event) sẽ được gọi và thực thi.
Thêm style cho button:
app.component.html
button {
    background-color: #46cf2b;
    border: none;
    color: white;
    padding: 10px 10px;
    text-align: center;
    text-decoration: none;
    display: inline-block;
    font-size: 20px;
 }
Kết quả:

Ví dụ Event Binding với sự kiện (change) drop-down
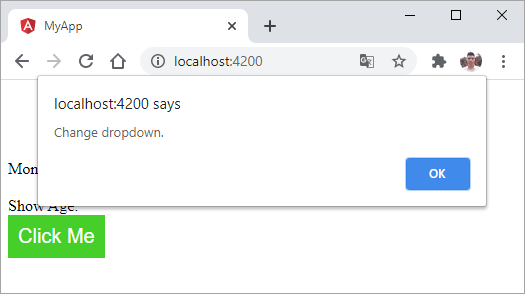
Bây giờ chúng ta hãy thêm sự kiện onchange vào dropdown.
Cập nhật file app.component.html :
<div style="text-align:center">
  <h1>
    Welcome to {{ title }}!
  </h1>
</div>

<div> Months :
  <select (change) = "changemonths($event)">
    <option *ngFor = "let i of months">{{i}}</option>
  </select>
</div>
<br/>

<div *ngIf="showAge; then condition1 else condition2"> Age = 18 </div>
<ng-template #condition1>Hide Age.</ng-template>
<ng-template #condition2>Show Age.</ng-template>
<br/>

<button (click) = "myClickFunction($event)">
  Click Me
</button>

<router-outlet></router-outlet>
Hàm changemonths(event) được khai báo trong file app.component.ts
import { Component } from '@angular/core';

@Component({
  selector: 'app-root',
  templateUrl: './app.component.html',
  styleUrls: ['./app.component.css']
})
export class AppComponent {
  title = 'Angular 7';

  // khai bao mang cac thang.
  months = ["January", "February", "March", "April", "May", "June", "July",
      "August", "September", "October", "November", "December"];

  showAge = false;

  myClickFunction(event) {
    // hiển thị thông báo
    alert("Button is clicked!");
    // hiện thị log ra console
    console.log(event);
  }

  changemonths(event) {
    alert('Change dropdown.');
  }
}
Kết quả:

