Tạo app đơn giản cho Apple Watch
Trong bài viết này, chúng ta sẽ cùng nhau tìm hiểu cơ bản về lập trình watchOS thông qua việc xây dựng 1 app chạy trên Apple Watch đơn giản. Cụ thể app gồm 2 màn hình: Màn hình list các friend, hiển thị full name, avatar. Màn hình chi tiết về một friend (full name, avatar, phone number, ...
Trong bài viết này, chúng ta sẽ cùng nhau tìm hiểu cơ bản về lập trình watchOS thông qua việc xây dựng 1 app chạy trên Apple Watch đơn giản. Cụ thể app gồm 2 màn hình:
- Màn hình list các friend, hiển thị full name, avatar.
- Màn hình chi tiết về một friend (full name, avatar, phone number, description).
Mở Xcode lên, chọn File > New > Project. Trong cửa sổ hiện ra chọn tab watchOS rồi chọn iOS App with WatchKit App, click Next.
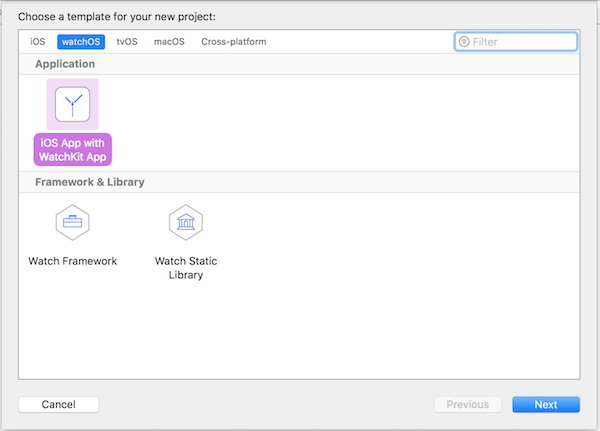 Trong màn hình options tiếp theo, chọn ngôn ngữ Swift, điền tên app và uncheck các option, click Next.
 Bên trái Xcode, trong cửa sổ Project Navigatior, chúng ta có thể thấy: ngoài folder Contacts chứa các file của target app iOS như bình thường, còn có 2 folder chứa các file của WatchKit App và WatchKit Extension.
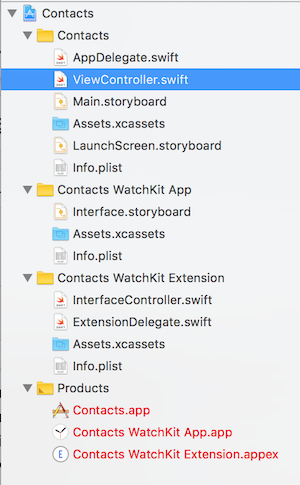 Group folder WatchKit App chứa các file Interface Builders (storyboard), các file asset cho watchOS app.
Group folder WatchKit Extension chứa các file .swift, chứa code các Controller được sử dụng trong watchOS app. Mặc định 2 file: InterfaceController.swift và ExtensionDelegate.swift sẽ được tự động sinh ra, tương tự như ViewController.swift và AppDelegate.swift của app iOS vậy.
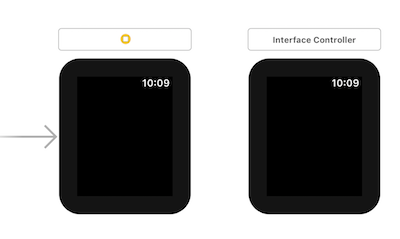
Mở Interface.storyboard, ta thấy có sẵn một Interface Controller Scene (giống View Controller Scene), kéo thả thêm scene nữa từ Object Library bên góc dưới bên phải. Như vậy, một cho màn hình list friend, một cho màn hình chi tiết friend.
 Kéo thả một Table vào Interface Controller Scene thứ nhất, document outline xuất hiện một Table Row Controller (giống UITableViewCell), set Identifier cho nó thành FriendRow.
Trong một row, lại có một Group. watchOS sử dụng đối tượng Group để quản lý các view, tương tự khái niệm Stack View trong iOS. Các object trong Group sẽ được layout linear theo chiều dọc hoặc ngang với khoảng cách căn đều giữa chúng.
 Chọn Group hiện tại trong row, set Spacing thành 6 (khoảng cách căn đều giữa các object con trong group bằng 6) và Height thành Size to Fit Content (height của cả group sẽ vừa bằng height của các object con nó chứa).
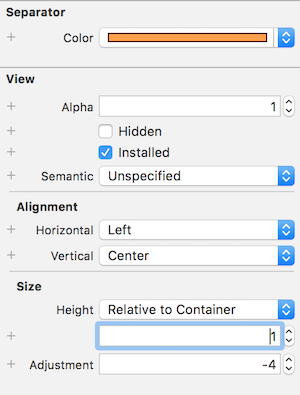
Tiếp theo, kéo thả một Separator từ Object Library vào row và set một số property trong Attributes Inspector như sau:
- Color: màu của thanh separator.
- Vertical Alignment thành Center: căn chỉnh theo chiều dọc kiểu Center.
- Height thành Relative to Container: height của separator sẽ phụ thuộc vào container chứa nó.
- Adjustment thành -4: vị trí lệch so với container theo chiều dọc.
Tiếp tục kéo một Label và một Image mới vào bên phải thành separator vừa tạo rồi set property như sau:
- Label: Lines thành 0, tùy chỉnh Font, Text Color tùy ý, Alignment Horizontal thành Left, Vertical thành Center.
- Image: Size Width và Height thành Fixed và bằng 24. Image Mode thành Aspect Fill, Alignment Horizontal thành Right, Vertical thành Center. Kết quả ta thấy giao diện trên Interface Builder như sau:
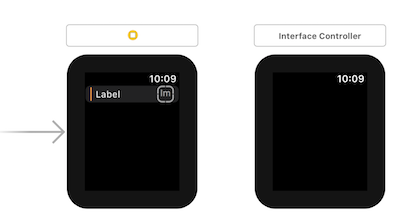
Từ Interface Controller Scene thứ nhất, giữ phím Control và kéo thả sang Interface Controller Scene thứ hai, xuất hiện Relationship Segue, chọn nextPage. Việc làm này nhằm tạo liên kết giữa hai màn hình, tương tự như trong iOS. Nhưng khác ở chỗ trong storyboard iOS, chúng ta có thể tạo nhiều relationship giữa các màn hình thông qua nhiều segue identifer khác nhau. Còn với watchOS, giữa hai scene chỉ có thể có một relationship nextPage duy nhất. Hãy thử tạo một Interface Controller Segue khác và kéo thử sang segue mới, lập tức relationship cũ sẽ biến mất. Tuy nhiên với app hiện tại, chúng ta chỉ chuyển màn hình khi người dùng tap vào các row trong màn hình list friend nên sẽ không dùng đến relationship nextPage. Design tương tự với scene chi tiết friend thứ hai, đặt Identifier cho nó là FriendDetail.
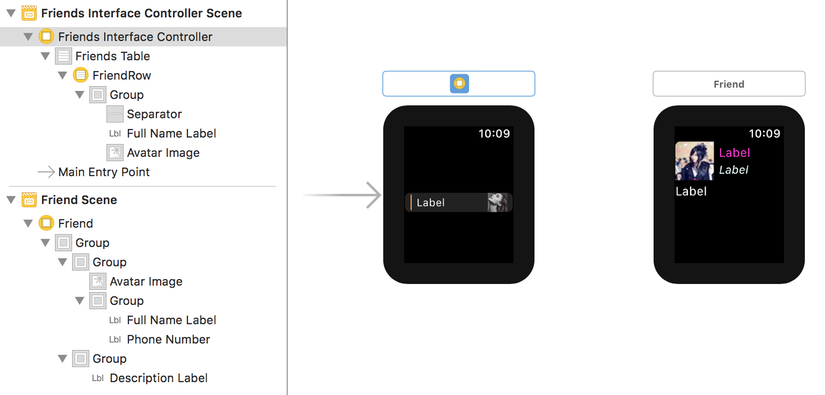
Như vậy chúng ta đã cơ bản hoàn thiện việc design UI cho các màn hình của watch, thử chạy project bằng cách đổi target sang WatchKit App và run với simulator iPhone 8 + Apple Watch Series 3, kết quả là chỉ một màn hình đen sì hiện ra. Giờ là lúc thêm chút code cho nó hiện thị ra.
Trong folder WatchKit Extension, xóa file mặc định InterfaceController.swift đi, và tạo một file WatchKit Class mới, sub class WKInterfaceController, đặt tên là FriendsInterfaceController.
 Trong file .swift mới tạo, ta thấy có ba function override mặc định awake(withContext context: Any?), willActivate() và didDeactivate() lần lượt tương ứng giống với viewDidLoad(), viewWillAppear(_ animated: Bool) và viewDidDisappear(_ animated: Bool) trong iOS. Ngoài ra còn một số function khác, có thể xem thêm bằng cách nhấn Command + click vào class WKInterfaceController.
Mở file Interface.storyboard trong folder WatchKit App, chọn scene thứ nhất, chọn tab Identity Inspector, set Custom Class thành class mới tạo. Sau đó mở chế độ Assistant Editor hai cửa sổ, tạo IBOutlet cho Table bằng cách kéo thả.
Xóa hai function tạm thời không cần dùng đến willActivate() và didDeactivate() và thêm đoạn code khởi tạo cho Table.
import WatchKit
import Foundation


class FriendsInterfaceController: WKInterfaceController {

    @IBOutlet var friendsTable: WKInterfaceTable!

    override func awake(withContext context: Any?) {
        super.awake(withContext: context)
        friendsTable.setNumberOfRows(10, withRowType: "FriendRow")
    }

}
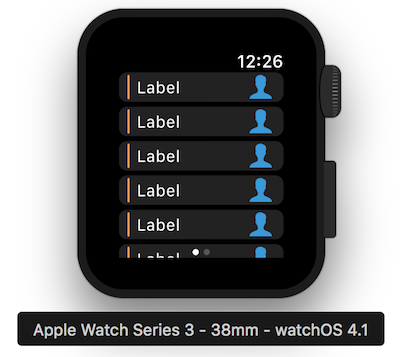
Build và run lại, ta thấy một list các prototype row hiện ra.
Bước tiếp theo, ta tạo model cho dữ liệu. Tạo file struct Friend.swift với các property sau.
struct Friend {

    var fullName = ""
    var avatar = ""
    var phoneNumber = ""
    var description = ""

}
Thêm function generate data hard code vào FriendsInterfaceController.
    private func fakeFriends() -> [Friend] {
        return [
            Friend(fullName: "Gal Gadot", avatar: "1", phoneNumber: "0923874343", description: "Wonder Woman"),
            Friend(fullName: "Michael Santana", avatar: "2", phoneNumber: "0923874343", description: "Hi, I play video games. Business inquiries."),
            Friend(fullName: "鈴華ゆう子Yuko Suzuhana", avatar: "3", phoneNumber: "01248292849",
                   description: "鈴華ゆう子 Yuko Suzuhana 歌手、詩吟師範、剣詩舞、ピアノ ◆和楽器バンド(ボーカル) wagakkiband.jp ◆華風月(ピアノ&ボーカル)"),
        ]
    }
Table trong WatchKit đơn giản hơn nhiều so với table view trong iOS, không cần dataSource, không cần delegate. Chỉ cần tạo một class row controller, kế thừa từ NSObject. Tạo file WatchKit Class mới, kế thừa NSObject, đặt tên là FriendRowController. Tiếp theo mở lại file Interface.storyboard, đổi custom class của Table Row thành class vừa tạo, tạo các IBOutlet tương ứng.
import WatchKit

class FriendRowController: NSObject {

    @IBOutlet private var fullNameLabel: WKInterfaceLabel!
    @IBOutlet private var avatarImage: WKInterfaceImage!

    func updateUI(data: Friend) {
        fullNameLabel.setText(data.fullName)
        avatarImage.setImageNamed(data.avatar)
    }

}
Với WatchKit, chúng ta nên sử dụng func setImageNamed(String) để set ảnh cho một Image. Sửa lại một chút class FriendsInterfaceController như sau:
    @IBOutlet var friendsTable: WKInterfaceTable!
    var friends = [Friend]()

    override func awake(withContext context: Any?) {
        super.awake(withContext: context)
        setDataForTable()
    }

    private func setDataForTable() {
        friends = fakeFriends() // Hard code data
        friendsTable.setNumberOfRows(friends.count, withRowType: "FriendRow") // Set number of rows of table and register cell identifier
        for index in 0..<friendsTable.numberOfRows {
            guard let controller = friendsTable.rowController(at: index) as? FriendRowController else {
                continue
            }
            controller.updateUI(data: friends[index]) // Update UI cell with data
        }
    }
Để xử lý chuyển màn hình khi người dùng tap vào một row của Table, ta chỉ cần override table(_ table: WKInterfaceTable, didSelectRowAt rowIndex: Int).
    override func table(_ table: WKInterfaceTable, didSelectRowAt rowIndex: Int) {
        presentController(withName: "FriendDetail", context: friends[rowIndex]) // Present next screen with context object
    }
Lặp lại các bước tạo class FriendDetailInterfaceController cho scene thứ hai.
class FriendDetailInterfaceController: WKInterfaceController {

    @IBOutlet private var avatarImage: WKInterfaceImage!
    @IBOutlet private var fullNameLabel: WKInterfaceLabel!
    @IBOutlet private var phoneNumber: WKInterfaceLabel!
    @IBOutlet private var descriptionLabel: WKInterfaceLabel!

    override func awake(withContext context: Any?) {
        super.awake(withContext: context)
        guard let friend = context as? Friend else {
            return
        }
        avatarImage.setImageNamed(friend.avatar)
        fullNameLabel.setText(friend.fullName)
        phoneNumber.setText(friend.phoneNumber)
        descriptionLabel.setText(friend.description)
    }

}
Kết quả cuối cùng khi chạy. Màn hình list friend.
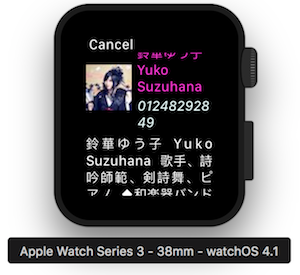
 Và khi tap vào một row, chuyển sang màn hình friend detail.
Nhìn chung một app cho Apple Watch đơn giản và dễ làm hơn so với app iOS. Còn nhiều điều thú vị có thể tìm hiểu về WatchKit, hẹn trong bài viết lần sau. Source code: GitHub Nguồn tham thảo: https://developer.apple.com/documentation/watchkit https://www.raywenderlich.com/170177/watchos-4-tutorial-part-1-getting-started https://www.raywenderlich.com/170193/watchos-4-tutorial-part-2-tables
